Debugger
If you have one of our debuggers for card10, this page details how you can use it. The debugger looks like either one in the following pictures:
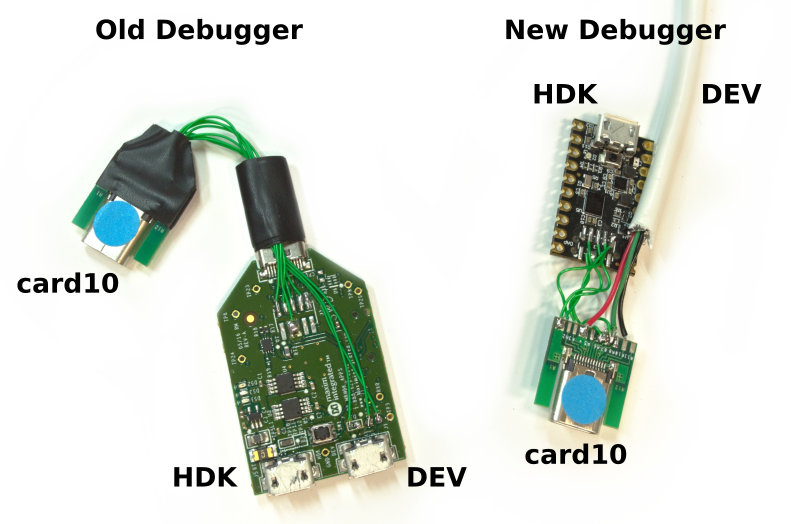
First of all, you need to connect your debugger and card10. There are three connections that you need (take a look at the above diagram for more info):
HDK: This connection provides debugging (SWD) and UART.DEV: This connection provides power (battery charger) and the native USB connection (bootloader).USB-C: Connect the proved USB-C cable with the side which has the blue dot, so the blue dots have the same side.
Console
When using the debugger, you will usually have two /dev/ttyACM* devices (one
each for HDK and DEV). To avoid confusion, allow access without
sudo and tell ModemManager to ignore them, you can use the following udev
rule file (saved under /etc/udev/rules.d/99-card10.rules):
SUBSYSTEM=="tty", ATTRS{idVendor}=="0d28", ATTRS{idProduct}=="0204", MODE="0664", GROUP="plugdev", SYMLINK+="ttyACM-card10-hdk", ENV{ID_MM_DEVICE_IGNORE}="1"
SUBSYSTEM=="tty", ATTRS{idVendor}=="0b6a", ATTRS{idProduct}=="003c", MODE="0664", GROUP="plugdev", SYMLINK+="ttyACM-card10-dev", ENV{ID_MM_DEVICE_IGNORE}="1"
After changing udev rules, you need to tell the udev daemon:
$ sudo udevadm control --reload
Now, additional symlinks (/dev/ttyACM-card10-hdk and
/dev/ttyACM-card10-dev) will be created when connecting the card10.
OpenOCD
For debugging card10, you need our own fork of OpenOCD. It contains a patch which allows flashing both flash-banks instead of just one. Install it using the following commands:
$ git clone --recursive https://git.card10.badge.events.ccc.de/card10/openocd.git
$ cd openocd

$ ./bootstrap
$ ./configure --disable-werror
Warning
Make sure CMSIS-DAP Compliant Debugger is set to yes (auto) after
running ./configure (if it is not, you might need to install libhidapi-dev
(Ubuntu)). If you get errors making the documentation you can
touch doc/openocd.info to skip it and continue with make.
$ make -j8
Please run make install after removing any already installed OpenOCD
version. Otherwise please always specify the full path to OpenOCD (the binary
is under src/openocd).
Note
If you want to use OpenOCD as normal user, copy contrib/60-openocd.rules
into the /etc/udev/rules.d/ directory and run udevadm control --reload
afterwards.
GDB (arm-none-eabi-gdb)
Apart from OpenOCD you also need arm-none-eabi-gdb. You should install
that package from your distros repositories:
Ubuntu (older):
gdb-arm-none-eabiUbuntu (newer):
gdb-multiarchArch:
arm-none-eabi-gdb
Debugging
Run OpenOCD from the openocd/scripts directory in the firmware repository.
Call it as openocd -f interface/cmsis-dap.cfg -f target/max32665.cfg. If
the debugger and card10 are connected correctly, you should see the following
output:
$ openocd -f interface/cmsis-dap.cfg -f target/max32665.cfg
Info : CMSIS-DAP: SWD  Supported
Info : CMSIS-DAP: FW Version = 1.0
Info : CMSIS-DAP: Interface Initialised (SWD)
Info : SWCLK/TCK = 0 SWDIO/TMS = 1 TDI = 0 TDO = 0 nTRST = 0 nRESET = 1
Info : CMSIS-DAP: Interface ready
Info : clock speed 2000 kHz
Info : SWD DPIDR 0x2ba01477
Info : max32xxx.cpu: hardware has 6 breakpoints, 4 watchpoints
Info : Listening on port 3333 for gdb connections
Next, start GDB in parallel and connect it to OpenOCD. You can do this easily
if you run GDB from the firmware repository root where we have provided an
init.gdb file. Specify -x init.gdb to use this file. Apart from
automatically connecting to OpenOCD, this script file also defines a reset
command to soft-reset card10.
$ arm-none-eabi-gdb -x init.gdb build/hw-tests/hello-world/hello-world.elf
...
(gdb)
Note
You will also find the following self-describing gdb files in the firmware
root directory, which do not require additional arguments:
flash-all.gdb,  flash-bootloader.gdb,
flash-both.gdb,  flash-epicardium.gdb,  flash-pycardium.gdb
Warning
If you are used to use mon reset halt, be aware that the card10 prototypes
do not connect the reset line to the debugger. OpenOCD is configured to only do
a soft-reset. This reset only resets the core, but not its peripherals.
Our custom reset sets a special bit in the CPU which also resets the
peripherals.
You are now connected to card10 and ready to start debugging! If card10 is still running, stop it using
(gdb) mon reset halt
Following that, you can debug as you would normally.